I don’t know if I’m the only one here, but I’ve been trying to get my head around Vuo for a while now (with the current learning material which I find it very short)… and I always get to the same point…too many nodes for so simple functions…I used to use Quartz, also, I know a bit of C, beginner level (not an expert by any means in any of them) so you would imagine I should be able to get my head around Vuo but I just don’t see the logic… However, I was watching a tutorial on TouchDeisgner and I’m very tempted to switch…it seems much more simple to implement compositions with more stylish results Also, why nodes aren’t organized on Vuo? by type of data or functions as they are organized on the documentation? the more time I spend on Vuo the bigger my frustration grows… Can anyone shed a bit of light here
Hi there.
Mmm, ok, funny you find it hard knowing QC.
I guess it’s personal, I’ve tried Touch Designer in the past but forgot about it because the learning curve is so hard. Way harder than Vuo in my opinion.
Touch has some nice third party nodes with some fluid stimulations, and support for some things Vuo does not, but Vuo also has features that Touch doesn’t have, like macOS apps and screensavers export etc.
In Vuo the node classes are sorted, not their titles. You can sort the node library by class as an option.
You can also filter by data type, for example type “image filter” to see all the image effect nodes, or type just “3D” to only see the scene based nodes.
What is a concrete example you’re trying to achieve with Vuo ? Explain your goal or post a start composition, it might help for people to help you more effectively.
Cheers
Thanks for your reply Bodysoulspirit!
I haven’t dived in TouchDesigner but, by what I’ve seen so far seems much more intuitive. I think one of the main things that confuse me about Vou is the whole thing about events…and the second is the number of nodes that you need to implement very simple output… when I actually try to go through a composition analyzing it the step by step soon, it seems like there are nodes ding nothing… I’m sure it me no getting it but…
My main aim and reason of using Vuo is because I’d like to create my own image filter and image effects to load in VDMX… but what I manage to archive and what I see around made by other people has barely any attractive visually and I feel Quartz does a better job, of course, Quartz is not being developed so it doesnt make sense carry on on that platform. Also, is there a particle system on Vuo? because I haven’t been able to find a node for it. As I said, I’m sure it’s me no understanding something…but
You just need to think Vuo as pipes. Events stream down the chain as a push system only (for now).
This means every node that should execute should receive an event, otherwise it won’t fire.
The amount of nodes it depends for what.
For some cases maybe, but for some others I don’t think.
There is not yet an integrated particle system, it’s on the feature request you can vote on : Particle emitter node.
It has quite many votes so I expect it to pop up sonner than later (all opened for voting requests are here : Feature Requests.)
I just uploaded a quite dirty and heavy method using stock nodes for limited particles. Of course here a lot of math is involved, and the upcoming dedicated node will make that way easier. Someone made a particle effect node a while ago, but for Vuo 1.2.8, and he did not update it for Vuo 2. Was very powerful and simple.
Link to my stock nodes particles comps : Stock Node Particles.
If you have other specific questions or need help on a specific part of a composition, ask, all questions usually are answered here.
Cheers
Coming from QC can be frustrating as Vuo kind of is similar, but then it’s not. As @Bodysoulspirit says, opposed to QC it is a push system - or a trickle down system (that works).
Even though other applications might seem easier to get stylish results from, I personally find Vuo very quick and easy to get results from after getting the concepts and flow under the skin. Especially when it comes to image manipulation as your use-case indicates. I must admit it was not all that fun to begin with when transitioning from QC though.
The amount of nodes used in a sketch can vary wildly based on what you want to do. I can’t speak for TD, but displaying an image in Notch requires quite a lot more of both understanding and noodling/defining to get going. To give a few examples on why you might want to use a lot of nodes for “simple” tasks I will use the image Schachbrett_beim_aufwärmen.jpg by Sven Damerow on Wikimedia Commons (CC BY-SA 4.0). Converting these examples to filters/generators are done by setting the protocol (Edit → Protocols->Image X) before exporting to your plug-in of choice.
Step 1 - display an image:
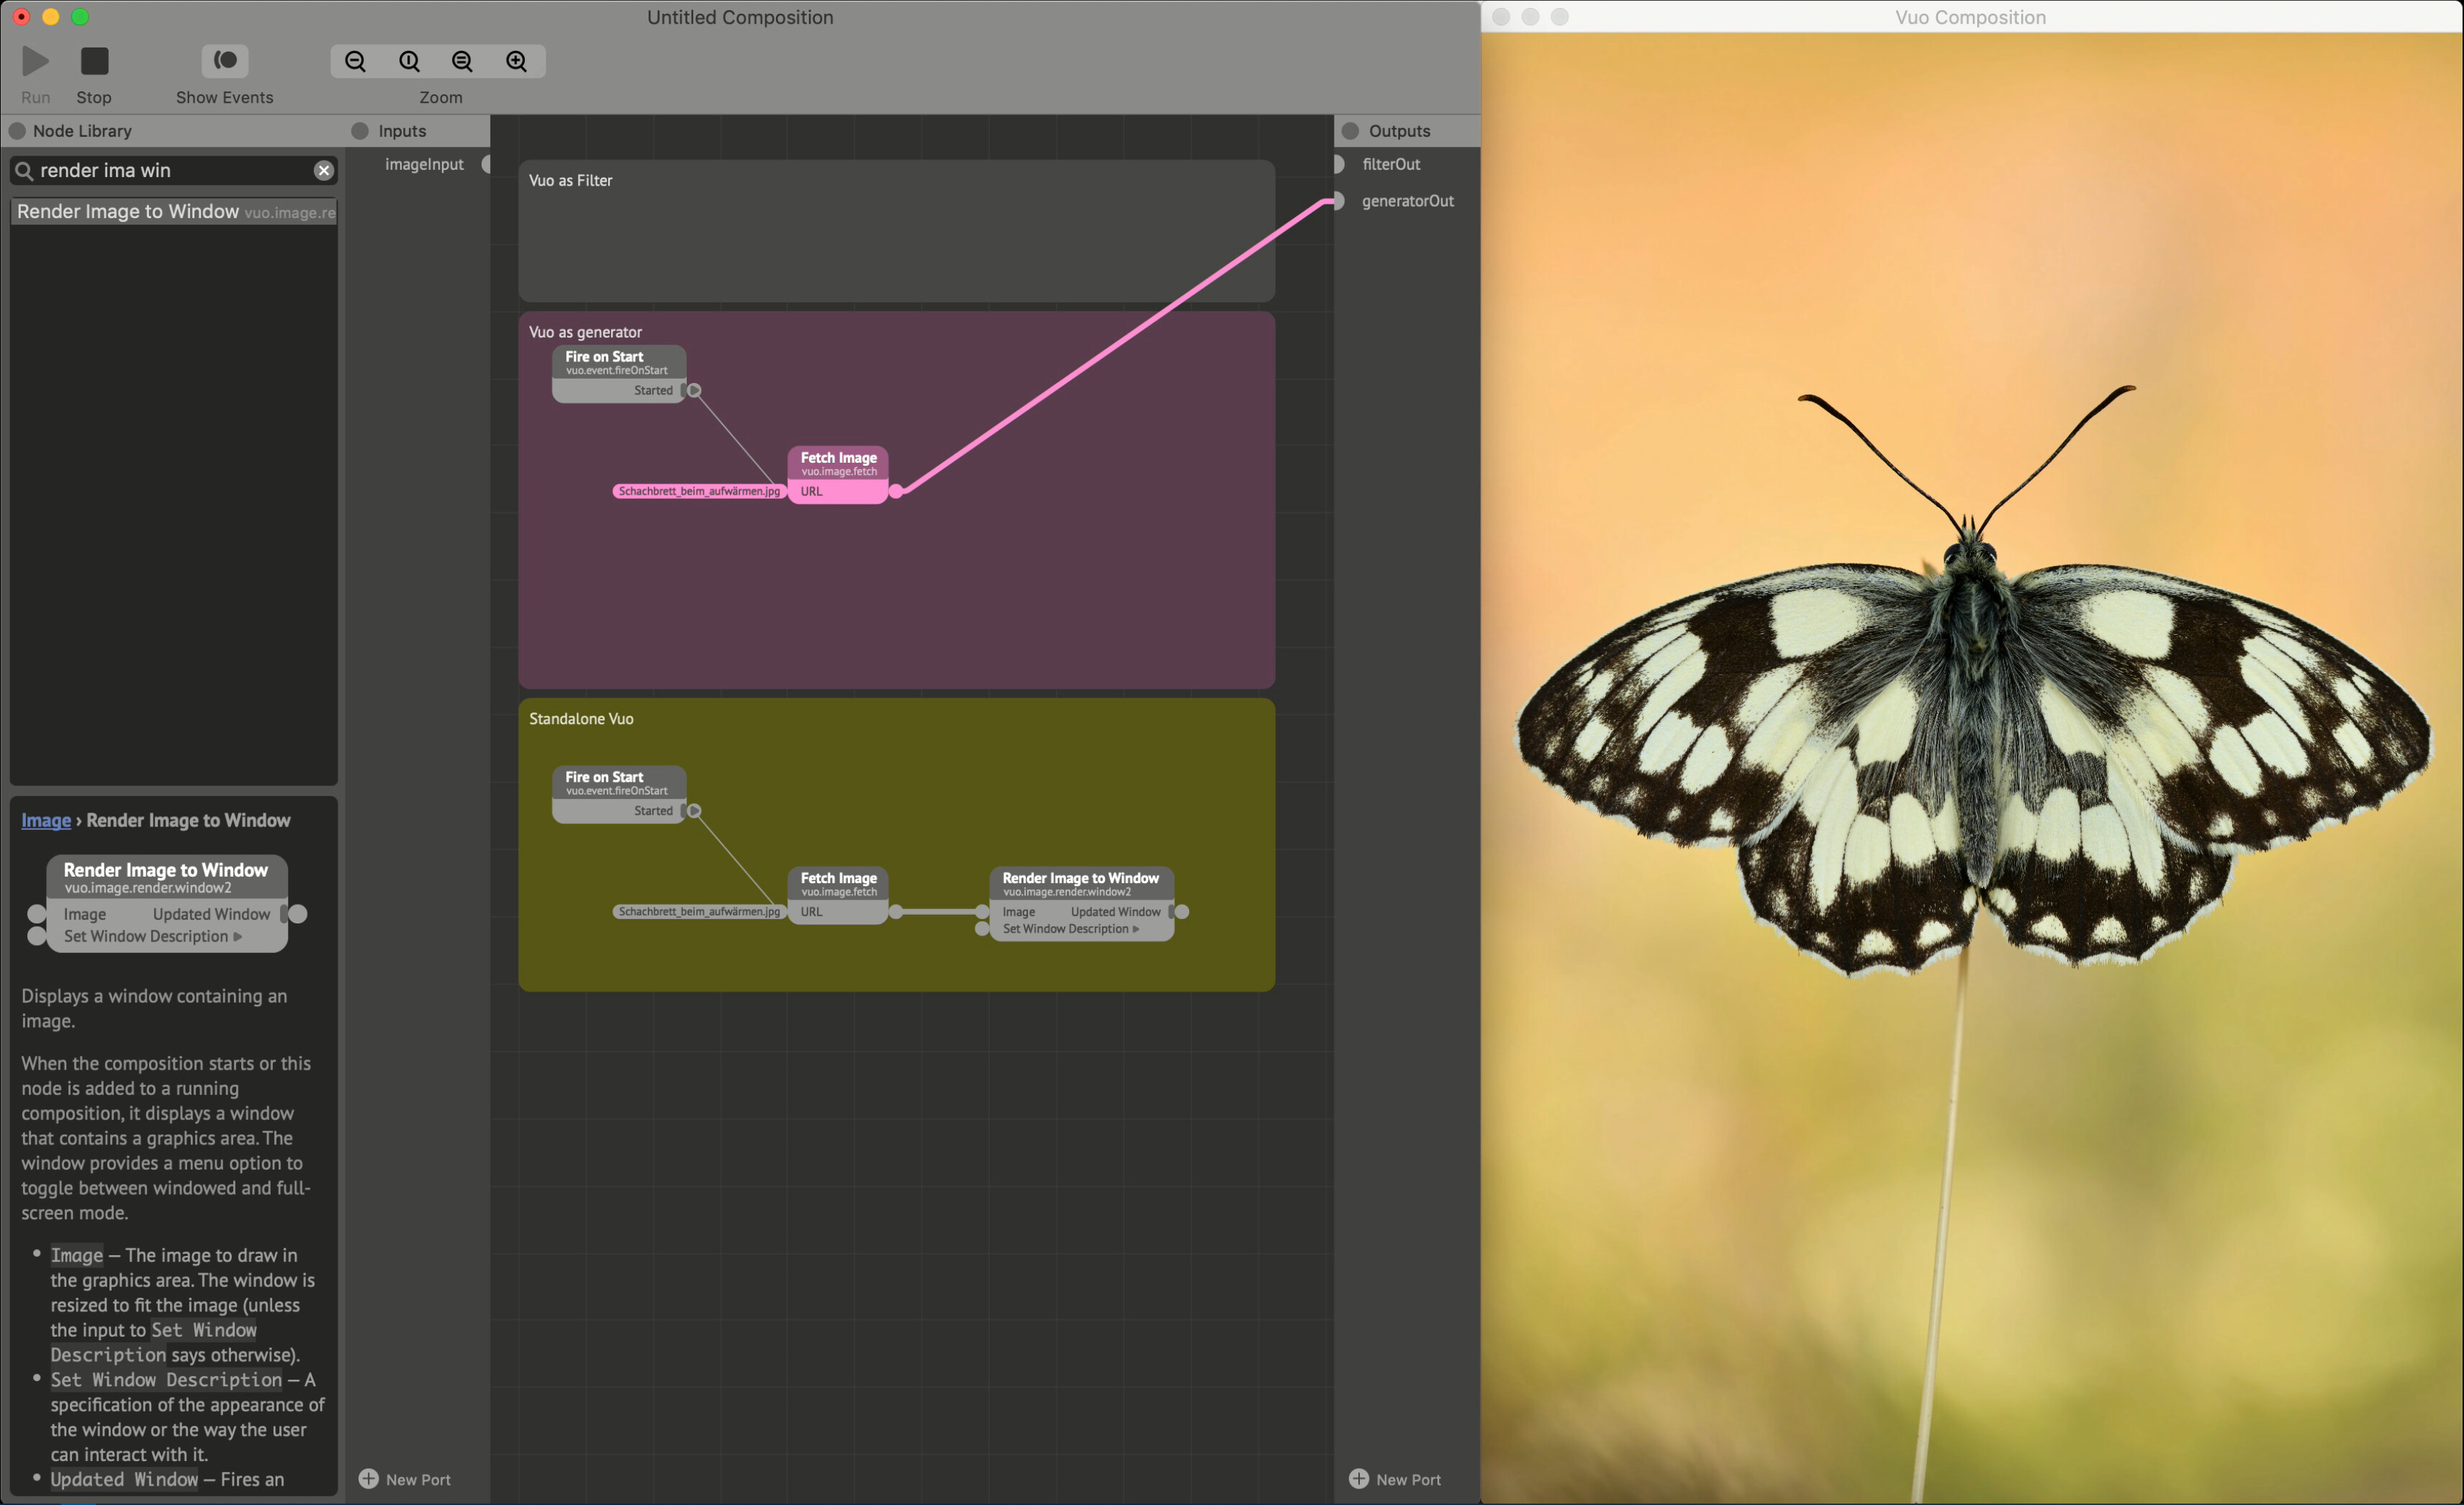
This just displays the image, but it also displays the two main features of Vuo’s control over the event flow in the graph. Thin lines are event lines, thick lines are data lines - which also may carry an event signal. This distinction is important to understand, as control of the event flow lets you pull of things in Vuo that is hard to do with the same hardware with other solutions. Note that if you are using a filter protocol, the image input will always fire events at the host framerate.
Step 2 - add an effect:

Here we blur the image by inserting a blur node between the image input source and the image output. Translated to the flow, we fire an event into the “fetch image” node which adds the image to the sketch. Then we push the image along with the event over to the “Blur image” node. This tells the blur node to take the image, process it, and then push the blurred image over to the output along with an event. In standalone mode this event tells the render node to render the image to the destination.
Step 3 - optimize (here I will cut out the generator/filter equivalents in the example photo).
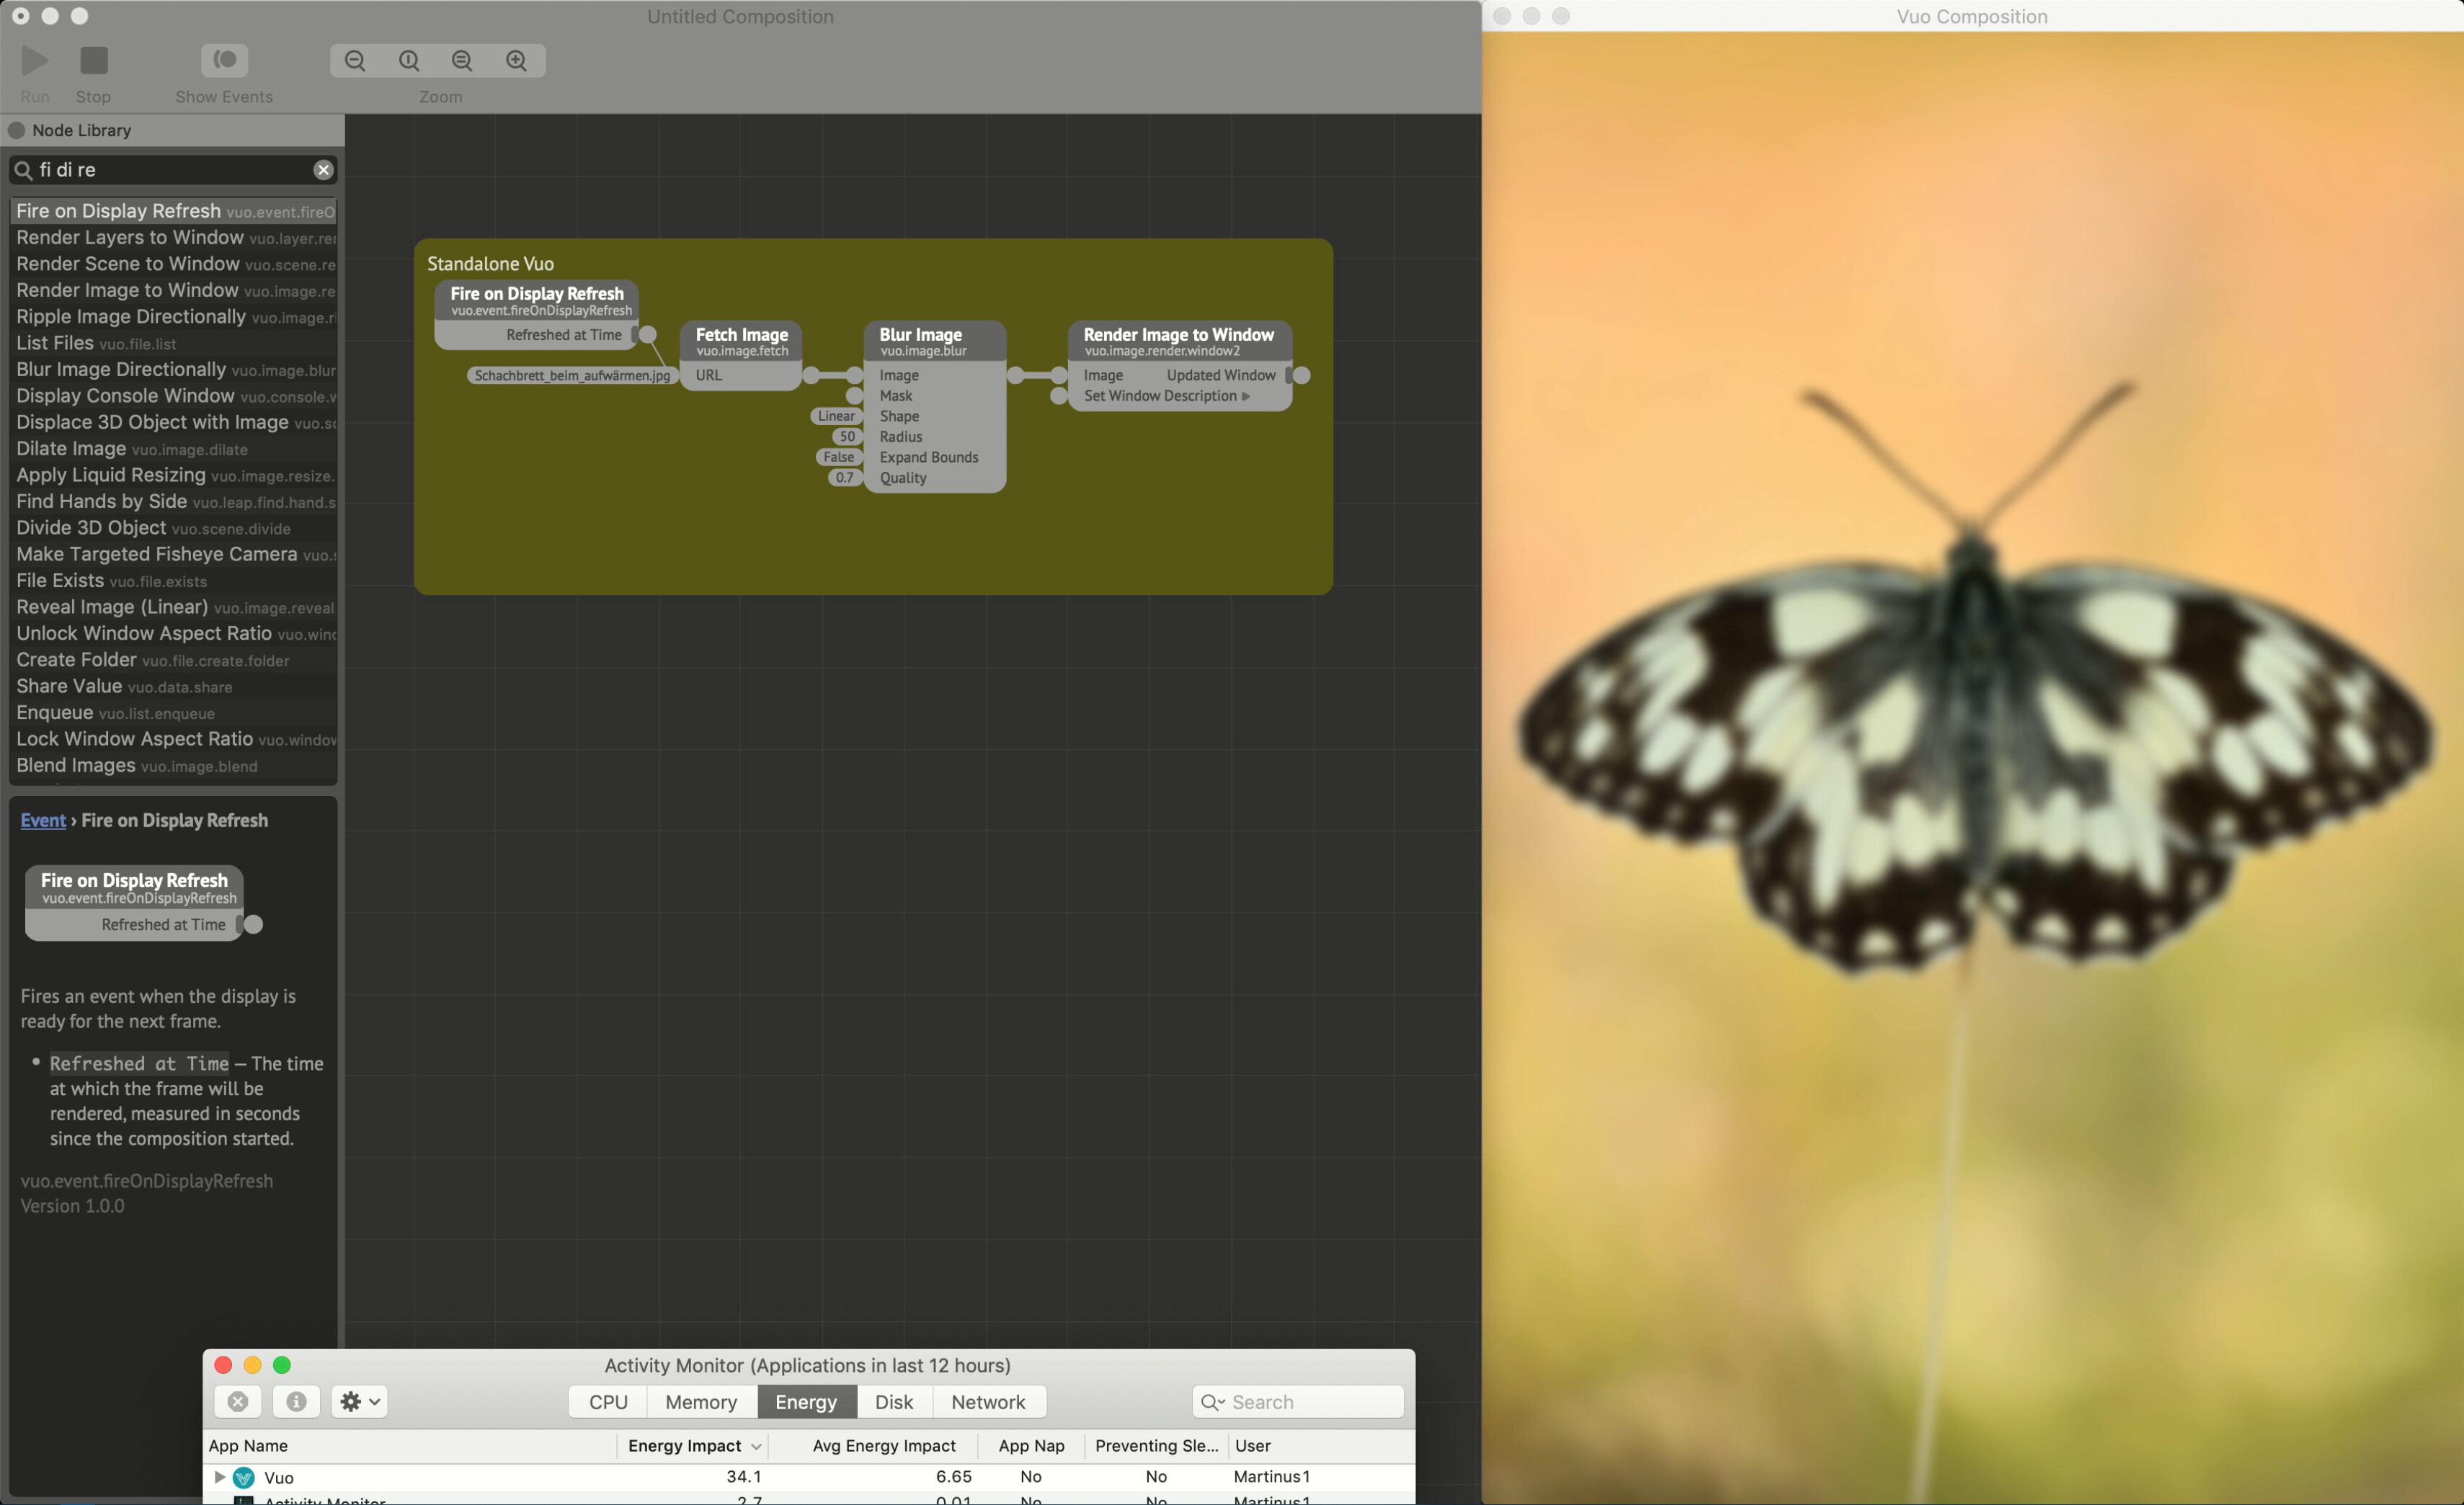
Admittedly, I have what is now a pretty rubbish mac. Only having used Intel Integrated Graphics on my personal laptop over the last 5-6 years or so has pushed me to focus on optimizing the sketches - which is a universally good thing. Looking at the energy impact for Vuo, this simple procedure of blurring the image is a really heavy operation which absolutely tanks the performance of the whole computer. It gets sloooow. Thinking about why it tanks performance though is key to optimizing.
The first issue is that by using a “Fire on display refresh” node, we are basically telling Vuo to do the whole operation 60 times a second. The second issue is that we do this operation on an image at its original resolution - which according to Wikimedia is 4852 x 7278 pixels. That is trying to process something at near 8K 60 times a second - on old intel integrated graphics! Or in other words: Stupid. Luckily we can do something about this!
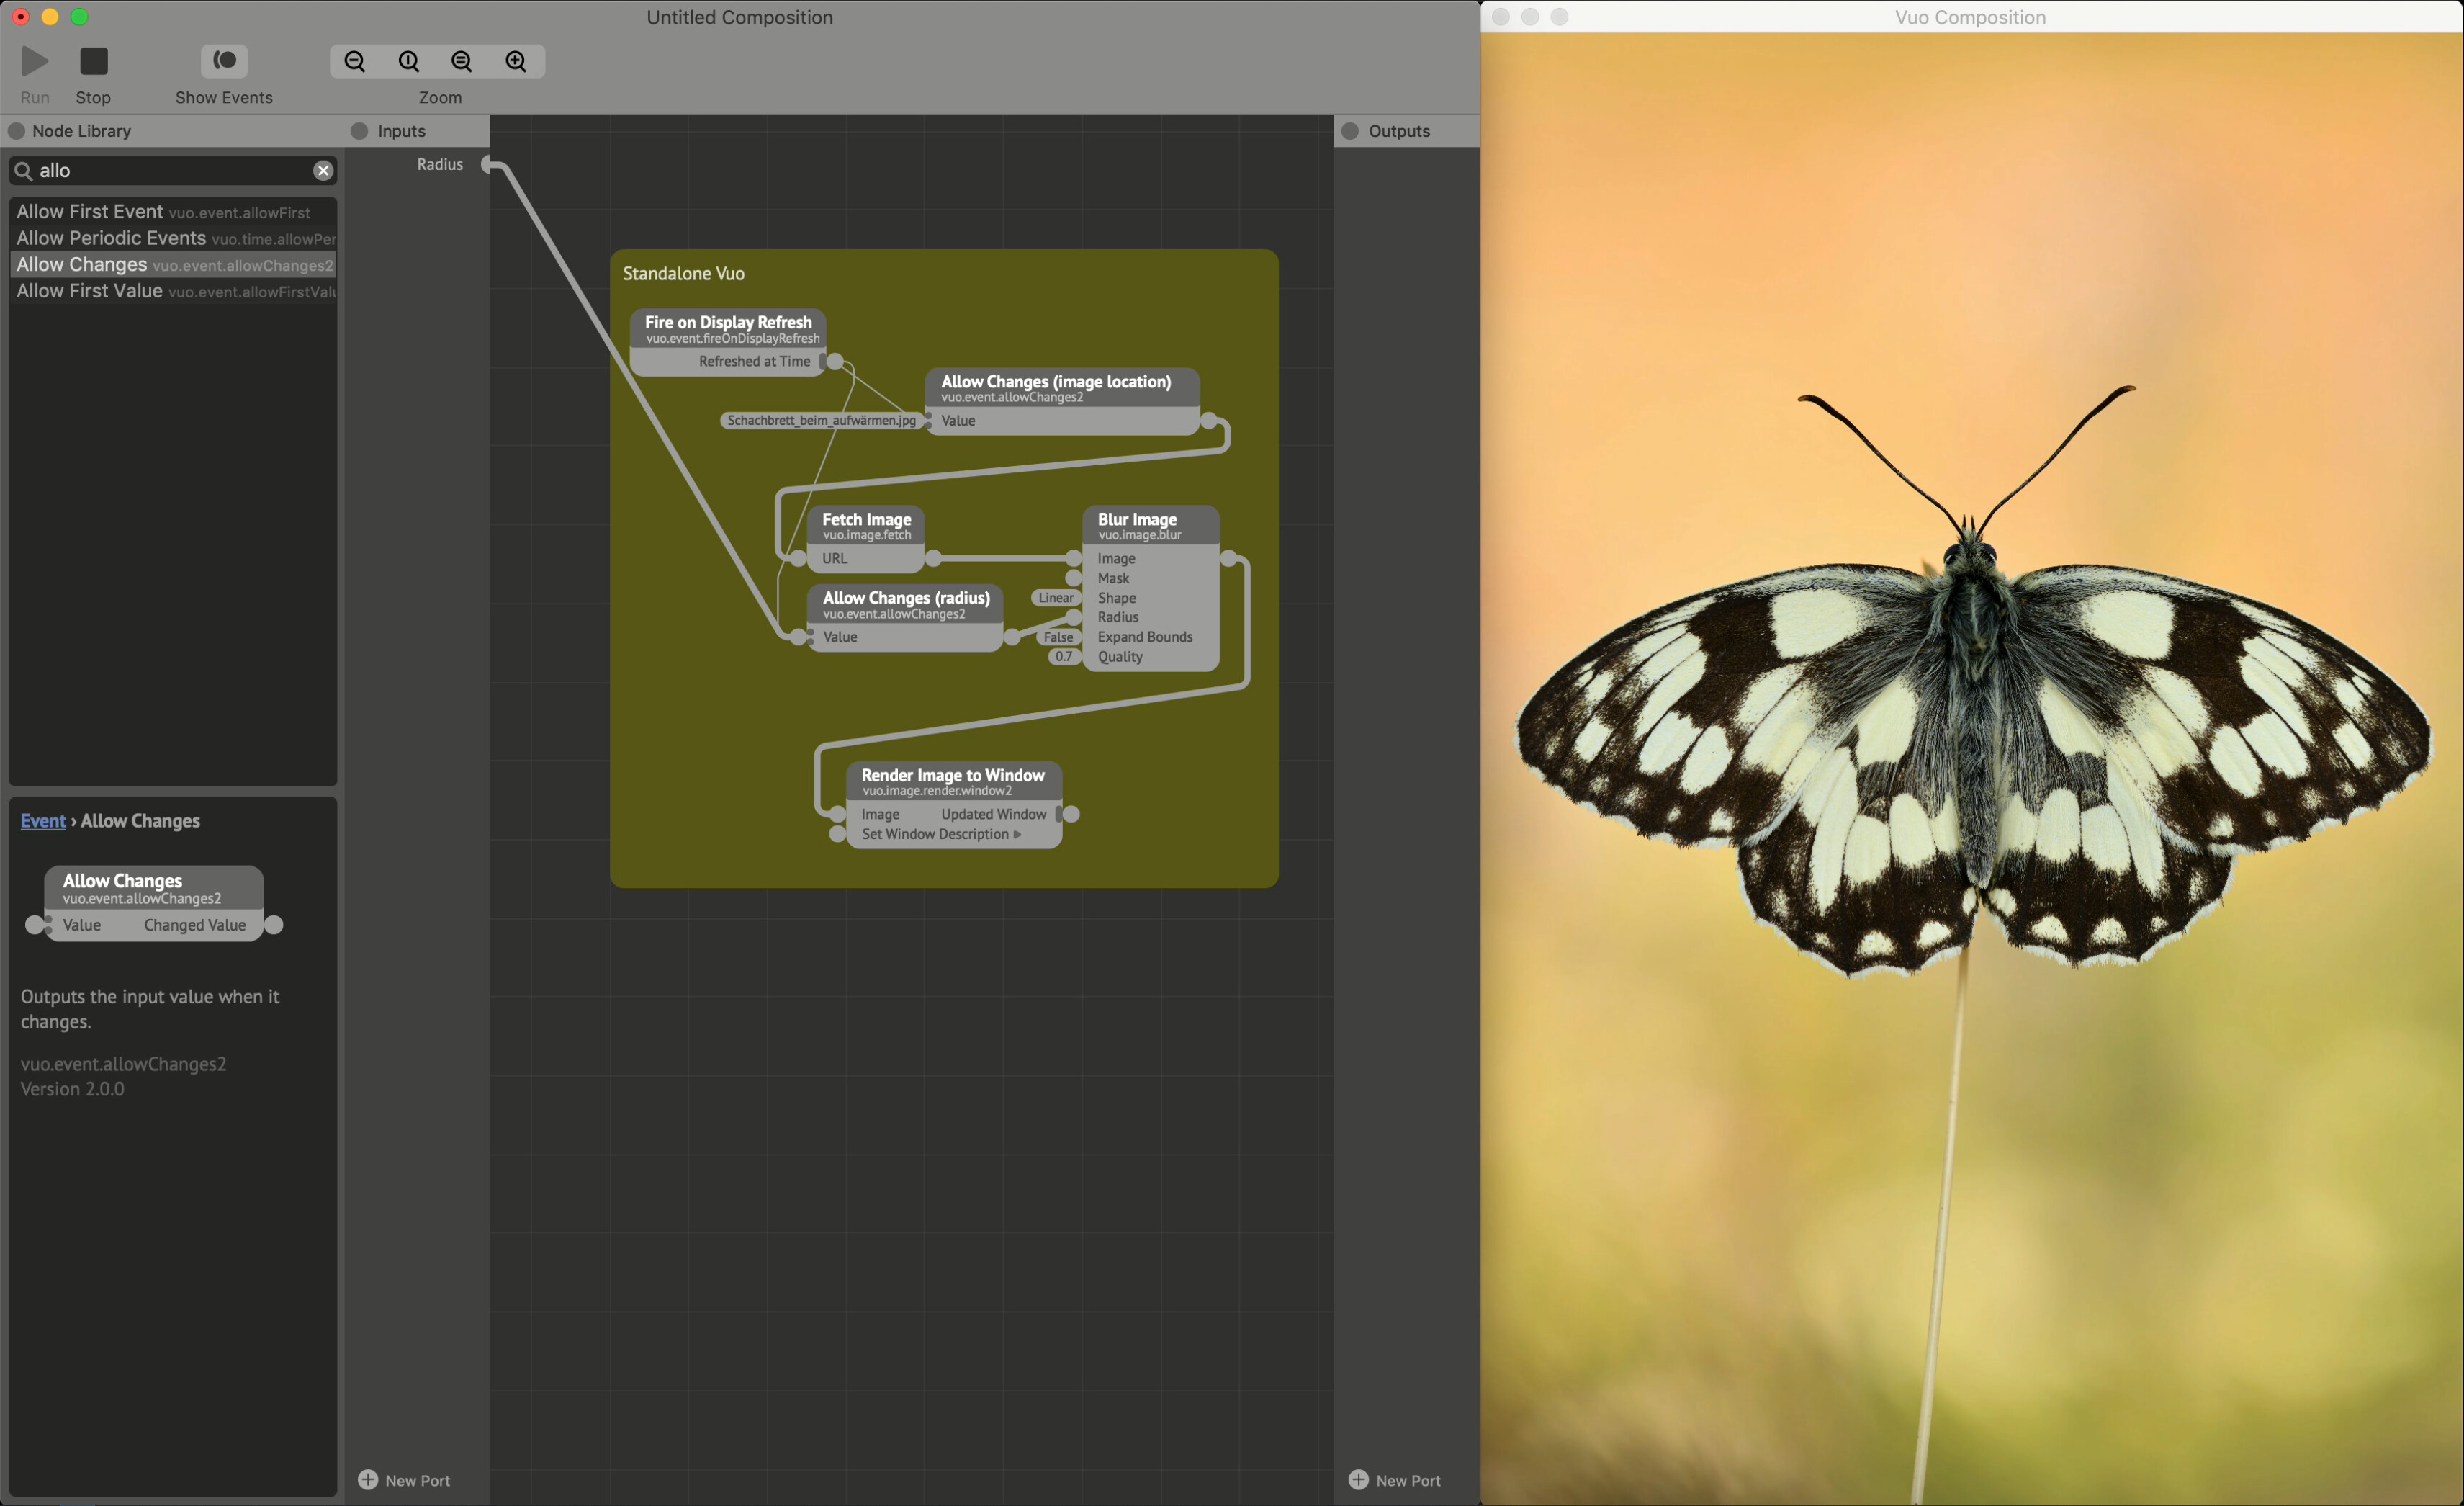
Enter the “Allow Changes” node. This node can be applied to any port type, and will only pass through events on changed values. Event blocking nodes like this one (“Hold” is another one) are indicated by two dots at the input. These will block any input events until they get a condition to passs them along. You can think of it as a universal gate only allowing for different items to pass through.
The reason for placing it on the path rather than on the image node itself is that loading an image and comparing it to the previosus one is still a relatively high intensity task compared to loading a small string of text and comparing that. Gating the radius (which is the value we want to edit) also ensures that we can have a fader connected to the value and adjust it at a whim, without telling the “Blur” node to process data every frame. Still, we (I) can’t use this node smoothly, as the resolution is too large to handle for my mac. Lets change that!
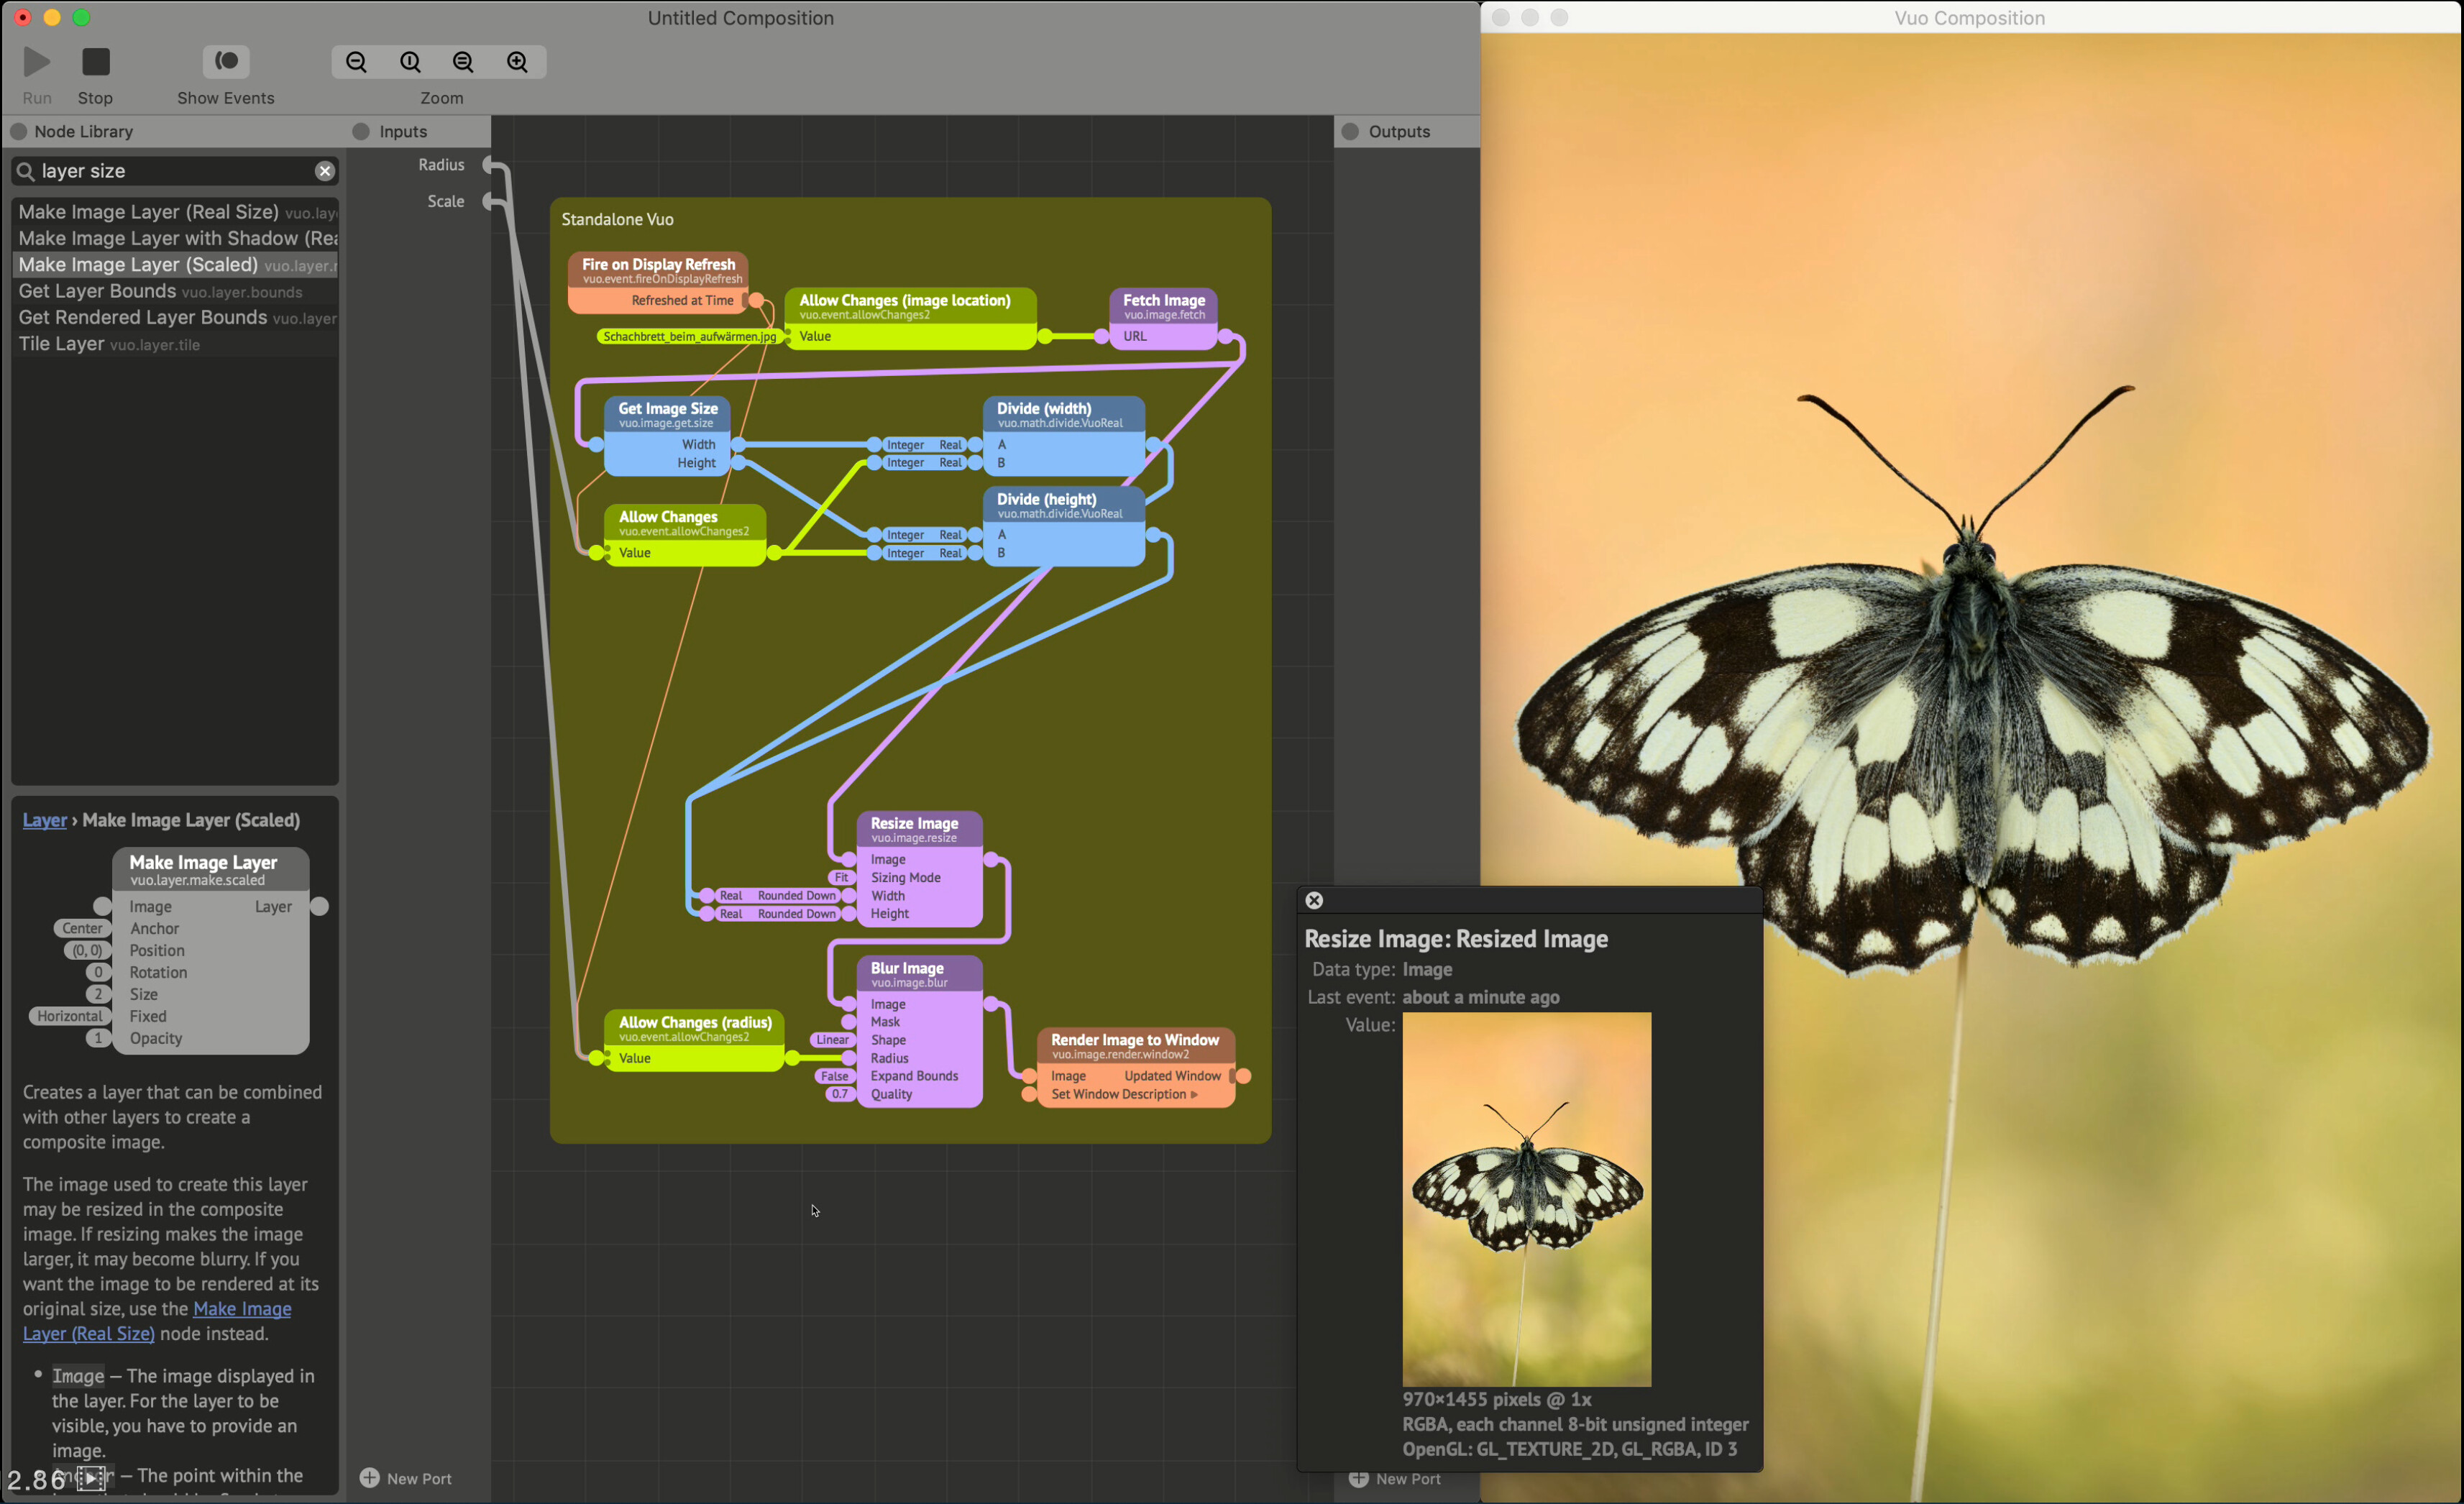
Here we add a few nodes to resize the image. We get the dimensions of the image when we load it, and push the image over to the “Resize image” node. As long as the image don’t change, it will be buffered in full in the Resize node. Not only is the image buffered, all values on the previous ports are also buffered. This means that when we add two divide nodes, the only thing changing is the incoming “Scale” value that we publish - and the only event flow we need is from that node to resize the image.
So now with the resize in place, we can smoothly blur our image! Note that the slight stutter/lag comes from the screen recording software (NDI scan converter + studio monitor), not the actual composition which is smooth (and also would be smooth if piped directly through NDI from Vuo).
A huge caveat with this sketch is that the image will… resize. Not shown in the images and videos above is what happens if you scale to a smaller size than the rendering window - and essentially what would happen with images as a plugin or in a rendering chain.
Fortunately, it’s a quick fix. Just add another “Resize Image” node before the final destination, hook it up to your original image dimensions, and it should stay the same pixel size at the output as at the input - while the processing happens at a lower resolution (the output image will still be lower res, but upscaled).
As I only can compare to Notch and Blender when it comes to other noodle-based systems, I don’t think this is an unreasonable amount of nodes to have something as optimized for live use as this is. The event flow control in Vuo might be hard to “get” at the start, but the fine tuning possibilities it gives you in this regard is are huge - and I’m not sure you have this kind of control of flow in any other application.
Blur might be boring - but it is heavy, and it is important. To spice things up a bit I’ll do more in the next post!
So, we have flow control, we have scale control, now we can have fun control! Compositing in general as I see it is more about having an idea about what you think is cool, and exploring what you can get out of the environment you work in. If other people think it is cool is a different thing though - and quite frankly that’s other people’s problem. Workflows, and ways to achieve looks is a gradual learning process, where you’ll have to have a certain grasp about what the different nodes do, and how you can manipulate them to do what you want. There are undoubtedly better teachers for general compositing on youtube than me. As Vuo behaves more or less like a live version of Photoshop (or Affinity photo for that matter) I can highly reccommend looking for Photoshop tutorials and try to implement the ideas they present in Vuo! I’ll have a go here though to maybe give a little kickstart.
By typing vuo.image in the search bar, it will list all of Vuos image processing nodes. A key node in compositing is the “Blend Images” node. This will act as something comparable to a layer control, with a background layer, and a blend mode and blend amount for the foreground layer. Size is determined by the background layer. A difference from Photoshop is in masking. Any image can in essence be a mask as well as an output, and it is applied by the second key node; “Apply Mask”. This is super useful, but can get confusing unless you take notes along the way. The handy “comment” function in the editor is accessible by right/two-finger clicking.

After typing this, I then went off with a general idea about what I wanted to do which was getting some kind of animation on the contours of the butterfly, and perhaps add some background elements. I’ll try to explain the flow of the composition instead of a step-by-step, as I tend to build these quite organically, and it will take too much time to explain and edit each step. The result however was this:

To make this, we begin with creating a contour/silhouette. What worked for this sketch was outlining the image, add a blur to the outline, blend it back with the original with a blend mode set to “Darker Components”, then using an “Adjust Image Colors” node to remove any color (saturation) and compensate for lost intensity. Even though this might seem like a convoluted way to get to the edge detection, there is a lot of information in the background that gets picked up by the “Outline Image” node as this doesn’t have a threshold (@JStrecker?). Now we have a base for our masks.

Next up, we grab the output from the previous section and feed it to a “Blend Image with Feedback” node. Into the “Feedback Transform” input, we feed a 2D transform which has a scale of 1.01 on both axis. This wil make it seem to flow out of the contours. To make it a bit more alive, we then animate the rotation parameter of the 2D transform with a “Make Gradient Noise” node. We now have our first mask.

Now we add a “Make Noise Image” node to flow out of the butterfly. Connect the Width and Height inputs to the “Get Image Dimensions” node from earlier, and make some pretty noise. Connect the output from this to the image input of an “Apply Mask” node, and connect the previous “Blend Image with Feedback” node to the Mask input. The first element is now done!

For the background, we re-use the original image and pipe it into a “Make Kaleidscope Image” node. Set it to some pretty parameters, and animate the Angle input with a “Wave” node, and it should be good to. Output the kaleidoscope node to the Background input of a “Blend Images” node, and take the output from the previous noise/mask and wire it to the foreground. I used “Overlay” as the blend mode here.

Last of the elements in the sketch is to add the butterfly back to the foreground. As we already have made a base outline for this, we can re-use this to make a mask for the butterfly. Just pipe the output from the “Adjust Image Colors” into a new “Blend Image with Feedback” node. This time however, we just set the Feedback Transform Scale input to 0.999 for both X/Y. This will fill the interior of the silhouette, and create a suitable enough mask for the image. Feed the output from the feedback node into a new “Apply Mask” node, and input the base image to the Image port. Connect the output from the mask node to the foreground input of a new “Blend Images” node, and connect the output from the previous “Blend Images” node to the background. Using a Normal(alpha) blend mode along with Foreground opacity set to 2 worked fine here.

Finally we can add some makeup and filters to the sketch to make it come together. RGB-offset/chromatic abberation is always fun (in moderation), some filmgrain, and a bit of tuned vignette is what it takes to go from a flat and not-so-exiting image, to something usable!

The composition itself can be foud here , with instructions on where to find the image used here.
Thanks so much to both for the explanation and for the tutorial/guide! I’ll try to spend a few more days playing with it and trying to learn the flow. Let’s see how it goes.
Any other advice you may have it’s very welcome. All the best guys!
It really is kinda hard coming from QC to Vuo in my experience, and I let go at a certain point. Not due to the challenges of the Vuo paradigm or it’s Editor but the nature of my work moved away from fun stuff to climate action activism in the last few years. I look forward to getting back to it though and it’s great to see some introductory tutes getting made (hat tip @MartinusMagneson) that ease people into the performance issues they’re bound to run into. The thing about QC is you could start from scratch and say plug an LFO into a Sphere patch Y-position and have a bouncing sphere with two nodes, no events to worry about, no windows and conversion of objects and scenes to images to worry about. And that instant gratification QC offer urged us to try more, animating it’s colour and other attributes within seconds.
The event paradigm is very powerful though, and while it’s unavoidable in Vuo and creates lots of headaches for new users, it is worth the power it unlocks to use control logic to optimise performance as shown in the simple example above. As for Touch Designer, I’ve never tried it but i know some QC users who switched to it for professional work many years ago because it had so many advantages c.f. QC.