Damn Martinus, you do really have some nice skills in a broad range of domains ;)
Amazing.
No luck yet with my wavetable files. I’m a little confused at the moment how to set up Comb List or ?. Viewing only the first part of the list in the output port display, looks like there are a lot of extra zeroes in my file, and I am not sure about the pattern and what/how to skip. Why so many zeroes? @MartinusMagneson as you mentioned, it seems that I should be able to “resample”. Need to bear down on the numbers. It would be nice to tame the data to get back to something resembling the 32768 total samples → 16x2048, i.e., straightforward power of 2 stuff…
@bodysoulspirit I get lucky sometimes!
Comb list is for the visual part only, I’ll come back to the implementation but you have to think in terms of samples and bits in relation to the bytes you work with. This might cover things you already know, but I can give a simple breakdown of it for others that might be interested as well. For audio, samples determine the pitch resolution, and bit-depth the amplitude resolution. When we speak of a 44.1KHz 16bit audio file, we mean that we have sampled the analog signal 44 100 times per second, with a quantization (rounding to nearest) of 16 bit = 65 536 different amplitude (loudness) levels.
Taking this over to byte manipulation; If 1 second of audio data is 44 100 samples, and there are 2 bytes per sample to give the 16 bits (there are usually 8 bits in a byte), you have 88 200 bytes for that second. Since the bytes are little endian it means that the first byte of a pair of two contains the detail information, while the second byte contains the coarse information. In practice the second byte place the amplitude into a coarse quantization of 256 levels (8 bit) from min(0) to max(255). The first byte place the amplitude into a fine quantization of 256 levels between two values in the *second *byte giving the total of 65 536 levels of amplitude.
That one second of audio is then represented in Vuo by a list of 88 200 integers with the Get Data Bytes node. If you combine the bytes to get the proper 44 100 samples with a resolution of 65 536 each, it would require a screen with a pixel resolution of 44 100px X 65 536px to display all of the detail. Undoubtedly cool, but unrealistic for most people at this time (and even if it were probable, it would be unnecessary as you wouldn’t see the detail). In addition, you want to avoid processing the parts you don’t need, as that would use a lot of resources for no benefit.
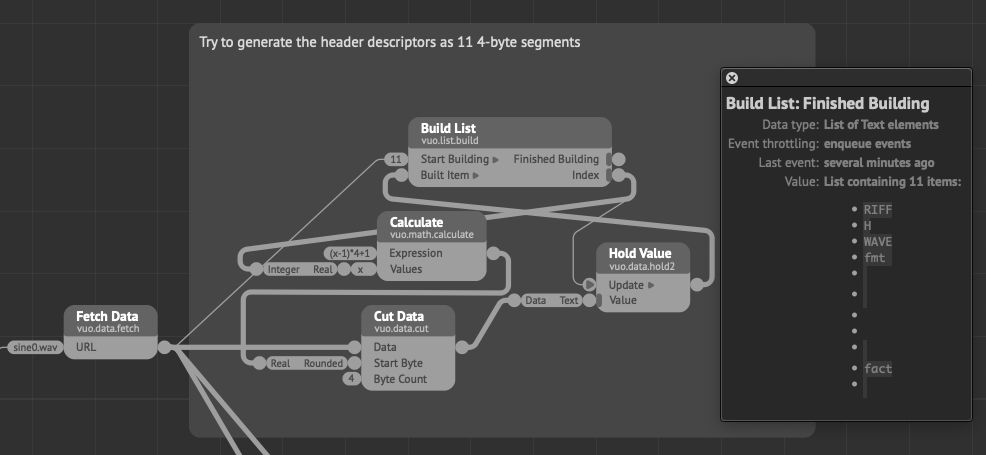
This is where we can start cutting away the data we don’t need to display. First of all is the header which by the spec is 44 bytes long. Then we don’t need the fine information carried by the first byte of data, meaning that we can skip that one and start at byte 46 using the Cut Data node. Something to note here is that since all the samples comes in pairs of 2, an odd number will always be the fine data, while an even number will always be the coarse data you want if you skip further ahead. If we now look at what we have, it’s still a list of 44 100 numbers for that second. As this is still far more than what’s needed for display, we can use the comb list to chop away more of the data before sending it to a mesh/object. So from the Cut Data node you can connect a Get Data Bytes node (which will give you a list of integers) and connect that one to a Comb List node. The Comb List works by specifying how many items in the list you want to keep, and how many you want to throw away. Here you want to keep 1 (as the next item would be the “fine” byte), and then skip an odd number until the number of points you get from it is a reasonable amount. If you keep 1 and skip 9, you effectively divide the list by 10, giving you 4 410 items in the list. If you skip 999, you divide by about 1000, giving you 45 items. Finding the suitable amount here for your display and sample length will take some tweaking. Smaller is better though as huge lists can be quite resource intensive.
As for 0s, if there is 1 millisecond of silence at the start of your wave data, it means that you’ll have 44 samples with a value of 0, and a list of 88 bytes with a value of 0 through the Get Data Bytes node. This will onlsy show 0s at the output port. If the length of silence is unknown, you could try scrubbing through your file using the starting point of the Cut Data node, and just add an offset to the byte count input with an Add node until something shows up. Or you could try locating the starting sample in an audio editor (probably faster/more accurate).
Note that this is only valid for a proper WAVE file as well. I’m not sure what the difference is to AIFF, but it could involve the header and the endianness of the data, so that would also have to be checked. Compressed formats (.mpX) will probably require decoding before something useful can be pulled from this approach.
Sharing my current stage, and my clear lack of knowledge. Still not quite getting the final result I need, digging in a little at a time, online research has not quite given me the whole picture, fragments here and there, stackoverflow, etc.
This is what I output right now:
I don’t understand a number of things –
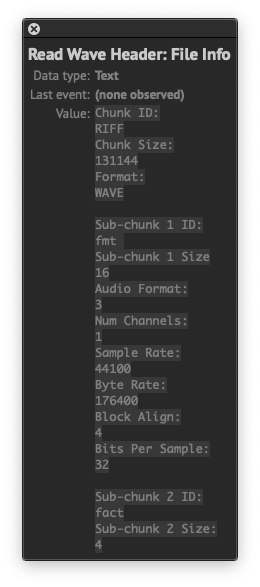
In order to get at least something that contains waveform like display, I need to set Cut Data start byte back to 45. Maybe this is because of the .wav file structure generated in the software I use (Plogue Bidule – uncompressed PCM)? Then there is the byte length of my file – 131153. How do I understand the header + remaining byte structure in relation to my 32768 sample length, 16-bit mono, etc.? I should double check, but I’d be really surprised if Bidule output anything other than clean, most universal .wav format. What makes most numerical sense is sample length*4 = 131072, which leaves 81 bytes left over – why? Then there is Comb List set to skip 5 – why every 6th byte in the list?
@MartinusMagneson – that 8-bit conversion calculation, I have not quite unpacked that, I want to understand the 8-bit integer conversion 'Get Data Bytes` is outputting, is the calculation something about uLaw conversion? Feeling the desire to simplify to generate a [-1,1] range then apply height scaling…
In general I am looking ahead a bit to having a reliable setup to handle a range of wavetable size and waveform cycle length.
Take a look at this page which apparently is the source for the previously referred to image: http://soundfile.sapp.org/doc/WaveFormat/. It has a better explanation of the header.
I think this discussion might go into a full tutorial (the wave format should be well suited for that), but you will have to check the header to determine the specifics of your wave file. My example was a mono file, but if you have a stereo file, it will intertwine the data for each channel. You can read this from the “Num Channels” in the header. Basically you’ll have to determine the pick and skip count by the data in the header, which should enable an automatic conversion and display of the files as well. I’ll need some time to type it up, but I already have the header extraction done.
Yeah, I have that WaveFormat page open, too. Looking forward to seeing how you unpack the header, I have been struggling with how to get readable parts out of it by converting data to text. For example:
I appreciate the tutorial approach, and the general effort and guidance. My project is still specific to wavetables. The .wav files I will use will always be mono, 16-bit, 44.1k, linear PCM – most standard .wav format. Once again, a wavetable is a series of 16 single cycle waveforms, each precisely 2048 samples long (no silence). Other wavetables have more or less waveforms and different cycle lengths, though likely always some 2^n (256-4096). This is a standard format for wavetables used in many wavetable soft synths. I want to slice the n waveforms into a 3D view.
@jersmi See if the attached files makes any sense to you, and I’d appreciate it if you have any feedback on it :)
You shouldn’t need the attached composition/module, but they can be handy as a reference
VuoDataTutorial.zip (2.24 MB)
2 Likes
Received, @MartinusMagneson. This is a very generous thing you have done. You mean you want feedback on the doc? I was able to follow along, nice job making the general comp sci info understandable for the likes of me, appears to have cleared up my questions, I’ll see when I try to apply it to my scenario. Could use a little polish, I suppose – section headers, esp. for general info and Vuo related, maybe a bit more at the end about applying the concepts to other file types (if this is a general tutorial). Could these built-in Vuo techniques be applied to image or 3D object data, glitch art, things as such? And that Calculate List section, I’m still wondering if that calc could/should be simplified with constants. At any rate, my turn to try and apply the concepts.
Ok, an issue. Turns out a bunch of the files I am using are 32-bit .wav files. Right now the Read Wave Header subcomp only handles “standard” 16-bit PCM. It will need an additional part (and maybe an if/then test?) to handle the extra byte chunk for format type 3/32-bit (see the non-PCM data table here):
http://www-mmsp.ece.mcgill.ca/Documents/AudioFormats/WAVE/WAVE.html
Here’s a mod of the Read Wave Header subcomp which adds the extra header chunks to read the longer header for 32-bit float files (non-PCM). Thanks again, @MartinusMagneson, that subcomp was super helpful. This one outputs a length in samples, which then allows a calculation for byte count of the audio data, hope I got it correct – sub-chunk 2 size * sample length.
Edit: I learned that the 32-bit float sound files I am using were generated with libsndfile, which automatically adds PEAK/16 byte chunks (discovered after adding the extra header chunks):
chunkID: PEAK
chunkDataSize: 16
There is a “feature” to PEAK that generates a normalized peak value/position structure, but I don’t know how to check if it is embedded in the data or not. Bottom line: I’m still trying to understand why my 32-bit float waveforms are not outputting correctly to the viewer (still look the same as the pic posted above), so being fuzzy about PEAK/16 keeps it on the table as a possible culprit.
mm.readWaveHeader2.vuo (13.6 KB)
Thanks for the feedback! I don’t always write simple/clear enough so it’s golden to get something like that to iron out the wrinkles. Vuo has a build in data to image node, but I’ll see about examples for other uses. The tutorial should possibly be split into chapters as well to give more bite-sized approaches to it, the full thing can take some time to get through.
With 32-bit files, you need to take the byte count more into consideration as you have 4 bytes per sample. I didn’t write much about automating this from the header data as it would get even longer (chaptering it out might be a way to include it). You can divide the byte-rate by the sample rate to get the bytes per sample, and use that output to set the Comb List pick/skip count.
Having more chunks means you’ll also have to offset the start of the read to 45 + the bytes of the additional chunks. Ideally there would be a “Find in Data” node (or something like that) for scanning the file and provide the byte location of the “DATA” chunk-ID. Then you’d be able to use that to get to the starting point relatively easy. For now I think it will have to be a manual process though.
With 32-bit files, you need to take the byte count more into consideration as you have 4 bytes per sample. I didn’t write much about automating this from the header data as it would get even longer (chaptering it out might be a way to include it). You can divide the byte-rate by the sample rate to get the bytes per sample, and use that output to set the Comb List pick/skip count.
Helpful, though I need to review what the four bytes/sample do and which are useful. Put this in the chapter, “Now, how can this header mumbo jumbo actually help you manage the data?” :-)
Having more chunks means you’ll also have to offset the start of the read to 45 + the bytes of the additional chunks.
That’s right — see the manual approach in the mod of your subcomp above, Read Wave Header 2.
That is a good chapter title! ![]() The bytes are still little-endian, you just need to use the 4-byte conversion instead of the 2-byte conversion.
The bytes are still little-endian, you just need to use the 4-byte conversion instead of the 2-byte conversion.
Ideally there would be a “Find in Data” node (or something like that) for scanning the file and provide the byte location of the “DATA” chunk-ID. Then you’d be able to use that to get to the starting point relatively easy.
Magneson,
Please create a FR if you’d like that functionality. @smokris noted: “WAV files are RIFF-format and thus can contain arbitrary binary data. Simply searching for the text DATA in the file won’t always work — the binary data might happen to match the text DATA, then the composition will mistakenly think that’s a chunk header rather than the arbitrary data that it is.”
Also of interest is the feature request for Decode Audio Frame.
Yeah – if one knows the .wav file compression format, then one can “manually” sort out the header data, correct? That is, I understand that .wav is a container for multiple compression types.
This is what Wikipedia says:
“The WAV file is an instance of a Resource Interchange File Format (RIFF) defined by IBM and Microsoft. The RIFF format acts as a “wrapper” for various audio coding formats.”
@jmcc, thanks for the Wikipedia, apologies if my response seemed behind the curve here. I was just processing that users can still manage the data in .wav files with available Vuo tools if the user can sort out header + data structure if the compression type is known, indicated in header byte chunks (using something like @MartinusMagneson’s subcomp or whatever).
And acknowledging that it would not be practical for Vuo devs to put out a “find in data” to cover all .wav compression types (cuz I have no idea what the range of possible byte orders there might be out there with proprietary types, etc.).
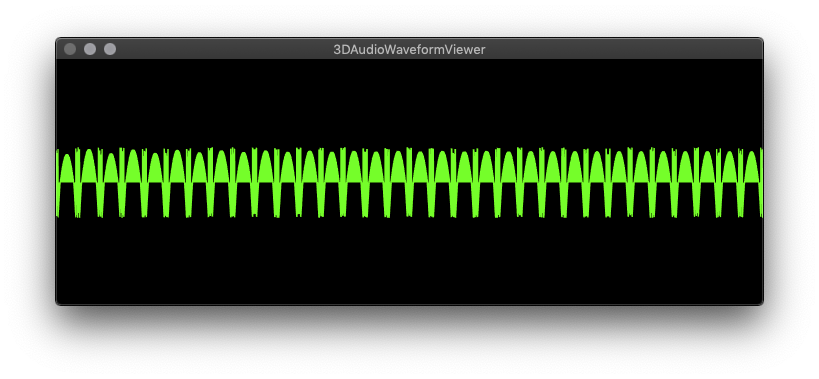
I am still stumped on getting my 32-bit float .wav to output correctly. I’m pretty sure I have the header+data sorted, I just haven’t figured out how to parse the waveform data. Should look like 16 continuous sine waves, but mine still looks like the pic.

@jmcc Yup, I don’t think my thoughts around how such a node should/could work is complete or backed by enough knowledge about how to deal with it yet either. I’ve read a bit more on the RIFF format/spec, and it gets even worse. The WAVE spec does not specify a distinct order of the chunks, meaning that you can stumble across something that place the DATA chunk before the FORMAT/FMT chunk. Not good practice, but not disallowed either.
The official spec is here: https://www.aelius.com/njh/wavemetatools/doc/riffmci.pdf (starting on page 56 for WAVE)
I however found a more informational explanation here: https://sites.google.com/site/musicgapi/technical-documents/wav-file-format which is where it’s mentioned that chunks doesn’t need to be ordered in a specific way. It also lists a bunch of chunks to consider, which can be pretty cool for creating WAVE files from data with included cues, playlists and MIDI information.
@jersmi can you cut the length of your data down to one cycle to see what’s happening and post the pic of that? You have 32 sine-like peaks in there with something in between (might be because of the scaling). Dividing your data byte count by 32 should place you somewhere around one cycle depending on the stuff at the end.
Yeah, thanks, @MartinusMagneson. Logically I would divide my data by 16 – the test wavetable is 16 sequential sine waves. I’ll see what I can do.
The good news is that LPCM is by far the most used, and covering a few can cover a lot of ground. I know there can also be proprietary stuff for specific hardware/software, video cameras, game consoles. Then in addition to all the stuff in the doc you sent, there’s also other types of metadata. For ex., here’s an info page from the US Library of Congress on efforts to standardize and specs for embedding metadata.
Collecting more links to possibly refer to:
@jersmi Yup, and by having 16 sequential sine waves you should have 16 upwards pointing peaks, and 16 pointing downwards. From your image it seems like you have 32 peaks pointing upwards with something in between. As this is also repeating, it will be beneficial to “zoom” in on just one half-cycle of the main sine which would be 1/32 of the full image. By the looks of the wave it seems like the frequency of the part I’d expect to be at the negative range is quite a bit higher. Can you also try with a sine wave from the link I posted with the parameters I provided? Then you can check if the composition works as intended with the expected source material to see if it is the input that differs or if it is the composition that does something funky.